Tor Varden on the cheap. Or how I learned to stop worrying and love the cork.
In both my campaigns, I'm rapidly approaching the point where I'm going to need something to represent the tower of Tor Varden for the penultimate scenario in the Beacon Tower mission. The tower is described as 3 rooms, each 1.5' square, with the entrance door opening to room A, a door between room A and room B, and a door between room B and room C. In room C there is the start of a staircase leading to the upper level.


So how to create something that's not going to take an age, but is going to look half decent. I've been quite happy with how my tables have looked in the first mission, so it would be a shame to let my quality slip just as the scenarios are starting to get more meaty. My first thought was dungeon tiles, Black Magic Craft makes some nifty looking ones on his channel link. But I want my miniatures to look like they're really there when I photograph them, and not just floating on some 2-dimensional astral plane. Ok so I'm going to end up making the building, but that's a lot of effort for 1 mission. It ought to be modular so I could potentially reuse parts of it later on (like in the Shining Light Mission). And I don't wan't to have to buy a load of new tools to make it, I want to be able to use what I've got now.
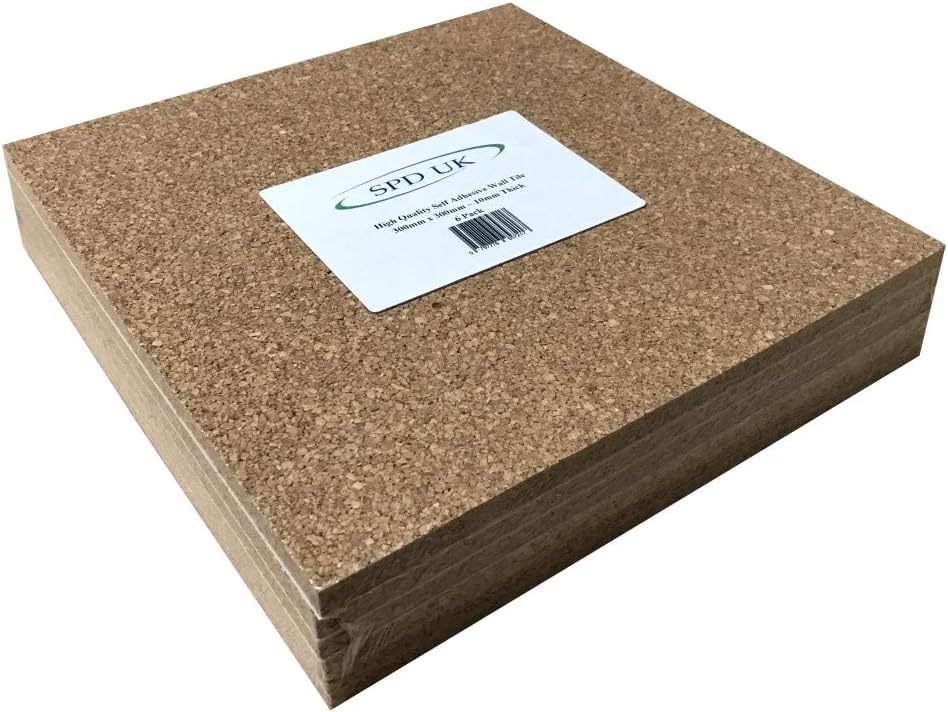
While idly trawling Amazon for something else I stumbled across these, self adhesive cork tiles. They're 300mm square, and each tile is 10mm deep—that's definitely deep enough to work as a wall. So if I were to cut each tile into 50x150x10mm lengths, 3 placed end to end would make a 450mm, or 1.5' section, that's long enough to be one wall for our Tor Varden room. So with 30 of these lengths, I've go enough to make the ground floor of Tor Varden, plus all of the rooms in the abbey from Shining Light.
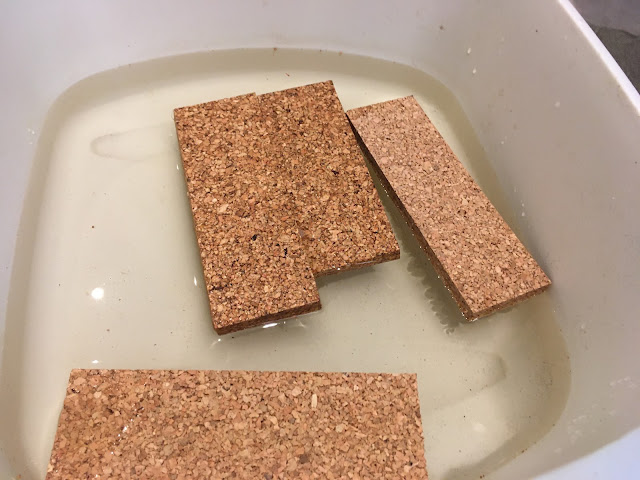
My original plan was to cut tiles from a cereal box, and glue them onto the lengths of cork to represent brickwork. However, about 30 minutes into this new endeavour I realised if this was what it was going to take, then this plan was never going to get finished. Perhaps I could leave the cork as is and paint strait onto it? Unfortunately the adhesive on the reverse of the tiles was the sort of stuff they use to hold perfume samples in magazines, and there is a lot of it. I tried painting one and it was devoid of texture. Ok, maybe the stuff peels off then? Well, it does, but not easily. What about if it's wetted? I chucked the first lot of cork into the washing up bowl over night and let it soak. Lo and behold, the next day the glue was much softer and with a gentle bit of persuasion (and a palette scraper) most of the stuff came off. Not the easiest or quickest task in the world, but it worked, and it stopped me wasting all the cork I'd just had delivered.

It's important to stress at this point (for anybody uninspired enough to follow this fool's errand) that once the glue has been scraped off, you really need to leave the cork for the best part of a day to completely dry out. Otherwise nothing, no paint, no glue, is going to take to it. Once it had dried, I glued on small (10x10x45mm) cork buttresses to each wall, to add some stability. On 3 of the walls I've cut a space just big enough to fit my dungeon doors (made by Blotz) and surrounded these doors with the greyboard tiles I'd cut previously. On these doorway sections I've added 4 smaller buttresses.
Starting to look like something eh?
Once the glue had all dried, I gave the walls a covering with slightly watered down interior DIY paint. The first coat was Homebase's own brand Zebra Black. Whatever the colour, it's important to water down the first coat because house paints are quick thick, and they won't brush into the cork's surface if it isn't. Once this had dried I went over it with a lighter, stone colour (in this instance Homebase's Flintstone) which I used strait from the tub.

The same walls with a touch of colour.
This image gives you a better idea of the scale of the rooms.
After painting enough to make 1 wall, I stopped to take stock, and check everything was still going in the right direction. All said I'm pretty happy with how they are turning out. I now have 12 sections assembled and painted to this standard, I'm trying to tackle the construction 1 room at a time to make it seem a less gargantuan task. There's also lots more detail I'd like to add, like giving them a black/brown wash, a dusting with coloured pigments and putting come creepers and flock climbing up the walls. But for now I'm happy with the progress I've made. The whole thing's proving to take a lot longer than I was hoping, but then I'm put in mind or an image I once shot an account manager at work when they were asking “How was I getting on?” 2 hours into a new job.
More to come…


Comments